happy builder

 Coolthaihouse Photo Gallery

Construction Photos
Home > House Construction > Chok Dee #1

Project Design


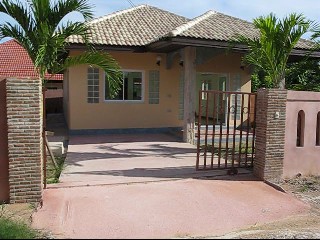
0803061018ExtFrontFromRight.jpg

Outside of the project blue prints and ability to view the model in real time in 3D (but at a reduced level of detail), it is nice to be able to get 'renders' to have enough detail to allow design decisions to be made.

11 files, last one added on Sep 27, 2011
Album viewed 381 times

Main Structure


IMG_3476.JPG

The structure is composed of concrete footings located at about 3 - 4 meter intervals. On top of the footing is a large ground beam highly re-enforced with 12mm rebar and appropriate cross sections. From there oversize cinder blocks were used as the foundation for load bearing walls. They have large holes (about 15cm. x 10 cm.) which are filled with concrete and vertical rebar to make internal support columns (within the walls). There are 3 re-enforced horizontal beams to give the walls lateral strength.

64 files, last one added on Sep 27, 2011
Album viewed 450 times

Roof Structure


IMG_8780.jpg

Roof trusses are normally not used here. However, they have a number of advantages. They can easily span about 12 m. By definition, a truss does not need any intermediate point of support within the span. The truss design in this house is an M shape. Heavy duty 4 x 2" box section metal (3.2 mm thick) is used to give more than adequate support for the heavy tile roof.

18 files, last one added on Sep 27, 2011
Album viewed 338 times

Plumbing


IMG_9378.jpg

The kitchen is serviced by a grease trap which exits into the a dirty water septic. The bathroom solids route into a safety tank, liquids go into another dirty water septic. The appliances are properly vented, with an air vent rising up through a designated opening in the oversize cinderblock, vertically through the roof material.

24 files, last one added on Sep 27, 2011
Album viewed 250 times

Electrical


IMG_4878.jpg

This project employs proper electric throughout. The system will consist of grounded electric which is run through tightly affixed (the screw attach type) power point boxes. Conduit is routed in the open cavities within the wall to the proper destination. No electric tape is used, wire nut fasteners are used throughout.

25 files, last one added on Sep 27, 2011
Album viewed 262 times

Finishing


IMG_4875.jpg

The finishing stage of the project. From decorative glass block inserts to archway support, terrazzo counter tops, ceiling framework up through laying the tile and installing the aluminum windows and doors.

54 files, last one added on Sep 27, 2011
Album viewed 221 times

Completed Project


080814ChokDee1Finished_0001.wmv

Various aspects of the completed project, views from the exterior, the great room, bedrooms, bathroom and attic. Also there is a movie clip showing the finished house.

23 files, last one added on Sep 27, 2011
Album viewed 758 times


7 albums on 1 page(s)

Last additions - Chok Dee #1
080814ChokDee1Finished_0001.wmv
Project MovieA short walk through of the finished project.dozerSep 27, 2011
IMG_4979a.jpg
Great Room ViewThe kitchen area and the main room are different shades of paint. There is a composite strip base board used as a skirting. dozerSep 27, 2011
IMG_5007.jpg
Front WinowThe windows are done in quality white aluminum with frames. The walls are thick due to use of 14 centimeter concrete blocks allowing space on the inside for decorative metal burglar bars. There are 4 exterior lamps on the front powered by 2 way switches (interior exterior). dozerSep 27, 2011
IMG_5019.jpg
Bedroom A/CAn interior bedroom shot of the large A/C 13000 BTU unit. dozerSep 27, 2011

Random files - Chok Dee #1
IMG_4354.jpg
Ceiling FrameworkThe ceiling framework which will allow the drywall sheeting to be applied beneath. The aluminum composite material is supported by hanging strips affixed to the roofing substructure. dozer
IMG_4449.jpg
Ceiling Sanding PlasterHere the plaster is sanded so that the ceiling paint will adhere. The round spots are where the sheetrock gypsum board is screwed into the aluminum framework. The lines are where the joints are taped between pieces.dozer
IMG_4915.jpg
Electric PostThe electric company comes to install an electric post. The house meter will be affixed to this post. The electric wire runs from the post directly to the attic area.dozer
0802250835BathRShSidei95.jpg
Bathroom View 1The bathroom is 2m x 3m. There are colored glass blocks used in the shower and main part of the room. dozer
IMG_4735.jpg
Skirting BoardThe skirting board is brand shera (same as the soffit material). It is affixed by drilling holes in the concrete wall and inserting a plastic grommet. Then a hole is drilled in the skirting board which then is drilled into place. The screws are countersunk so they are level with the surface. Then a white plaster is applied (as seen) to make the screw head undetectable. dozer
IMG_4332.jpg
Primer Second CoatThe second coat of TOA outside primer is applied. This is one area where it doesn't pay to corner cut, although you can get by with a single coat of an inferior primer the paint job won't hold up as it will with premo paints.dozer
IMG_3653.JPG
Different Size Crushed StoneNotice the two different sizes of crushed stone aggregate that will be used. The smaller one on the left is used for concrete which will be poured into the large cinderblock holes.
dozer
DSC03189.JPG
Fascia BoardThe fascia board being applied. It fits nicely in a groove under this CPAC monier roof tiles. The bird guard is applied while this fascia board is being applied. dozer

Debug Info 
Debug Output: show / hide